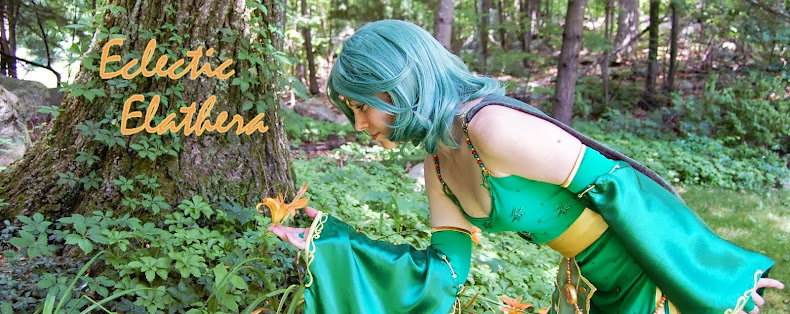
- A pink and yellow bead chain that runs from front to back, with a large round "bead" in the very front
- A yellow sash that hangs around Rydia's waist and drapes off to the right side. The draped part has pink trim and is weighted by a small bead string at the bottom
- Lastly, a sheer green draped number with embroidered interior and yellow trim.

The bead chain is fairly straightforward. A.C. Moore had a huge supply of beads in various pearlescent colors and different sizes, as seen below.
For the larger "bead" I used InstaMorph moldable plastic. This was my first experience working with moldable plastic, and it will definitely not be the last. It's a very handy material in that you can shape it virtually however you want. I bought a small can of it for $20 and still have a lot left over.
In order to get the correct shape, I made a pattern in clay and then froze the clay (so the headed plastic would not melt the mold and cause it to warp). I then inserted the ink tube from a pen inside the mold so that there would be a clear path to string this "bead" on the rest of the chain (any type of straw or small tube would suffice).
Lastly, I airbrushed the design details. This step is very important for moldable plastic. If you try to paint by hand, you are going to get brush strokes and it won't look nice. In order to only spray the targeted area on the "bead" I covered up the other sections with a paper towel.

I designed the sash as two separate components: the waist wrap and the drape. Because my choice of fabric is a satin-like material, it is very slippery, and I was afraid that the sash would unwind itself throughout the day and malfunction. The waist wrap goes around my waist twice and ties in the back (cloak conveniently hides the ties). The drape attaches (clips) on to the belt.
The drape was extraordinarily frustrating to make, and it was 100% my choice of satiny fabric. I ended up throwing out my first attempt because none of the lines were straight. And, despite my attempts to iron and smooth out any creases, there were a number of creased lines that I could just not get out.
Satiny fabric is very difficult to sew straight. It is slippery and uncooperative material. I made sure to use the proper sewing needle for the sewing machine and even looked up some helpful techniques, such as placing a layer of tissue paper in between the layers of fabric to prevent slipping. While these helped, they did not solve the problem entirely. I am not fully satisfied with how the drape turned out, but I decided it was not worth dwelling on further to have any chance of finishing this Rydia cosplay before ConnectiCon.
For the beads at the end, I used Martha Stewart's Pearl acrylics and hand-painted them. I did this piece before learning how to use the airbrush, so there are some paint lines on the beads if one looks close enough.

The green draped piece in the center was more fun. I used sheer green fabric from Joann in two different shades of green. I used two layers of light green for the entire drape and one layer of dark green for the middle section. The sheer material is very delicate and frays easily. A thin yellow gold rope was used to separate the three sections and sewed on by hand. The yellow trim around the edges is made from the same satin fabric as the belt.
For the two gold studs, I found something close at JoAnn's in the button section. The rest of the detail in the interior is hand-embroidered. I used metallic silver thread for the very bottom. The remainder was done with normal embroidery floss. To make the flowers stand out just a bit more, I added a couple red and orange beads.

You may be wondering what that small dark green thing is in the corner. I made two drawstring bags to hold personal effects (ID, credit cards, etc), which are tied around my arm and hidden inside the sleeves. It helps avoid those situations where someone asks for a photo and you either A) have purses or other non-cosplay items in the picture or B) make them wait while you pass all of these items to a nearby friend.
Lessons learned:
- Moldable plastic is awesome.
- Airbrushing is superior to hand painting.
- Avoid working with slippery fabrics. It is extremely hard to sew them to one another in a straight line. Or even to cut in a straight line. It's impossible.
- Hand embroidery really adds something. Look for opportunities to include this level of detail in small amounts (enough to get that "oh-ah" effect but not enough to drive you insane).
No comments:
Post a Comment