Showing posts with label Masquerade. Show all posts

Wednesday, July 17, 2013

Rydia cosplay complete!

Had a terrific time at CTCon last weekend!  It was nice to come across so many folks that appreciated a Rydia cosplay.  My costume earned a Judges' award in the novice division at the masquerade---one of the judges was impressed by all the beadwork and embroidery done by hand.  Next year I will have to shoot for first place!

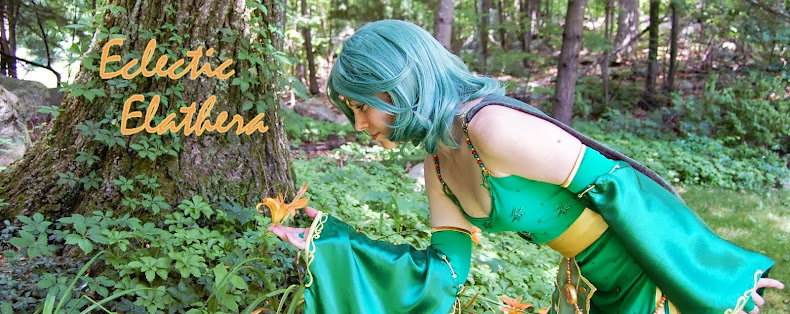
Rydia costume for ConnectiCon 2013
Time to make: 300 hours
Time to put on: 3 hours (mostly to pincurl hair and put on makeup)
Cost: $400
Weight lost: 3%
Result: Candice's Photographer Award

Here are a couple photos of my trial costume run taken by Glitterforge Phoenix.  My apologies on the quality...I'm not good with photo editing.  Will post professionally done photos once they are available. Stay tuned!
 
Rydia of Mist cosplay trial run FFiv CTCon Connecticon 2013 by Elathera
Rydia of Mist - Final Fantasy IV cosplay trial run by Elathera

Rydia cosplay trial run FF4 final fantasy iv CTCon Connecticon 2013 by Elathera
Rydia of Mist - Final Fantasy IV cosplay trial run by Elathera

Saturday, July 6, 2013

Rydia Leggings

The leggings were a very difficult problem to solve, and I am pretty sure I went about it very ineffectively.  Rydia's leggings have giant openings toward the top with golden trim on the edges and lots of fancy gold designs.
 
Rydia final fantasy iv leggings


 I was able to purchase leggings in a very similar color that were super opaque (partly because they were a one-size-fits-all and actually men's leggings).  That's the only piece that ended up going according to plan.


Lessons learned:


  1. Do not cut stretchy material while wearing it, as it may result in overstretching and/or warping.  I thought it would be a great idea to cut the leggings into just the right shape while I had them on.  The material ended up stretching out significantly in the thigh and had to be hemmed.
  2. Match the stretchiness of the fabrics being sewn together.  I really wanted to match the trim on the leggings to the yellow fabric I picked out for the rest of the outfit.  But, the yellow fabric is not stretchy as all, and in fact is downright slippery to work with!  I was able to overcome the issue with fastidious execution.  I basically measured out one-inch increments of the stretchy fabric while wearing it, and then pinned those stretched out increments to one-inch sections on the trim.  Heck of a lot of pinning work.
The slippery yellow fabric also frays very easily.  In order to make the trim, I folded and ironed the strips of trim into quarters, with the raw edges tucked into the center.  This technique seemed to work well.

Rydia of Mist cosplay FFIV leggings by Elathera

I could not solve how to make the pretty swirly designs in the yellow fabric, and ended up using some of the leftover material from covering the interior of the boots.  The discontinuity in colors is a bit bothersome, but it was certainly better than not including the details at all.  I used Elmer's spray adhesive to get the designs to stick to the leggings and then did some hand-stitching to ensure they would not fall off.

Thursday, July 4, 2013

Rydia Boots


Rydia of Mist FF4 boots
 
Oh boy.  Rydia's boots are pretty crazy.  Crazy and gorgeous.  This portion of her outfit took a bit of research to try and pull off.  I spent several hours browsing the internet for all manner of possible boots that could possibly be:


  • in that color
  • with a thick, low heel
  • reaching just above mid-calf
  • that didn't have a zipper in the front (difficult to cut)
  • and were less than $100

Needless to say, nothing was an absolute perfect match.  Fortunately I was able to find something fairly close on Amazon for about $70: Diba Women's pro gress riding boot.

Diba Women's pro gress riding boot for Rydia cosplay

The boot is suede, so it was fairly easy to cut.  For the intricate pattern around the edges of Rydia's boots, I decided to do beadwork.  All of it by hand.  All of it.  I probably poured close to 60 hours into plopping beads onto the boots.  When showing them to a friend, they asked why I hadn't simply used a bejeweler.  A bejeweler?  Never heard of one before!  I have heard of a Time-turner though, and could have used one to turn back the clocks before starting on this arduous beading endeavor.

Lesson learned: before tackling a difficult and/or time consuming task, do your research first!  It may end up saving you a lot of time and frustration.

Rydia cosplay boots FF4 hand beadwork by Elathera

It may look like the body of the boot is staying up nicely.  Lies and slander!  It was horribly flimsy even before cutting out the front.  Removing the front simply made it a lot worse.  In order to get the boots to stay up, I decided to attach them directly to the leggings.  Original plan was to use little velcro patches, however, they did not work very well. I ended up hot gluing the boots to the leggings.  Not the classiest approach, but it was at least functional.

Also, with all the beadwork I had a lot of knotted string on the interior.  In order to not have any of that nasty business show or irritate my legs from constant friction, I lined the insides with a suede-like cloth.  It ended up working nicely.
Rydia cosplay final fantasy iv boots custom beadwork completed by Elathera
You can see that the bottom does not fit snugly to my leg, as the boot is wider around.   And, when walking (as above), the boot material bulges out toward the bottom.  If I had to do Rydia's costume over again, I would have tried to make boot covers instead of modifying the real deal.

Rydia Arm Socks

To be honest, I had no idea what an arm sock was until very recently.  Rydia wears arm socks underneath her flowing sleeves.  They are attached to her middle finger at one end and to a gold band on her upper arm at the other end.

Rydia of Mist FF4 arm sock
I could not find a helpful tutorial online for making arm socks that attached at the finger, so I developed my own pattern.  This may look a little oddly shaped, but it miraculously worked out!

Rydia of Mist FF4 cosplay arm sock pattern by Elathera

The basic idea behind this odd-looking design is to have more material at the upper arm where the arm is thick which then tapers down at the wrist.  Then, the top of the wrist to the middle finger tapers again.  Lastly, the end is for a simple cloth ring "fingerloop".

Rydia cosplay final fantasy iv arm sock wrist portion by Elathera

A stretchy material seemed appropriate to use...the sock needed to be able to bend at the elbow and flexible at the wrist.  Since the last sewing tutorial for slippery fabric helped me tremendously, I took a look at FashionSewingBlogTV's other videos.  Lo and behold, she had another fabulous tutorial for sewing stretchy fabric.


Lessons learned:

1. The type of sewing machine needle actually matters.  I picked up a ballpoint needle from Walmart.
2. Use a lower tension setting and a stitch width of 2.
3. Stretchy fabric may only be stretchy in one direction!  It is super important that you keep this in mind when cutting out your pattern.  Luckily I caught myself just in time.

Rydia cosplay FF4 arm sock upper arm band by Elathera
For the arm bands, I ended up purchasing men's arm cuffs from Amazon.  They don't stretch per se, but do expand just a little bit.  I would not recommend using these unless you have very slim upper arms.  They are a gentle snug fit on me, yet do not look all that flattering for the exposed upper arm.

Rydia Sleeves, Part III

Only two parts remained to finish for Rydia's sleeves:

  1. Incorporate gold-colored string ties for the upper arm
  2. Add the starry details
Rydia FF4 sleeve detail

For the upper arm tie, I decided to use gold eyelets and weave a thin rope through the openings.  I bought one of those multi-dial eyelet crimper tools.  The tool itself worked nicely.  The tool in the hands of yours truly, however, ran into a small snag along the way.  The multi-tool ended up being too handy for me... when the gadget is squeezed shut, it has three different (simultaneous) uses:  1) make a 1/8 inch width hole in your fabric, 2) make a 3/16 inch hole, and 3) crimps eyelets shut.   Yours truly was trying to do #1 and had the fabric all bunched up in my hand, so I actually did #1 where the eyelet was intended to go (hooray!) and inadvertently made a small hole with #2 in the sleeve (doh!).

Rydia of Mist FFIV sleeve eyelets by Elathera
As for the stars, I thought embroidery would look the best. But, there are a lot of stars, and...

...so I listened to my husband (for once) and went with his suggestion to try airbrushing instead.  By making star-shaped stencils and using airbrush fabric paint, I was able to get crisp edges and vibrant color without having any nasty paintstroke lines.  I wish I had bothered with airbrushing around the sleeve opening, as that did have paintstroke lines.  It was actually kind of fun to use and gives a great result (with a little bit of patience to figure out how to spray evenly).  At least, it was fun for the first couple stars.  After that, it was downright tedious.  There are about two dozen stars on one side of the sleeve.  With two sleeves and two sides each, we're talking roughly 100 stars to airbrush!

Rydia cosplay FF4 airbrushed sleeves by Elathera

A word of advice: use a hairdryer on a low heat setting to expedite the drying time for airbrushed paint.  Also, music and/or mindless tv shows on Netflix help to pass the time.

Rydia Sleeves, Part II


So, about those intentions to blog concurrently with costume design...blogging definitely fell by the wayside.  There were a couple months where I had to take a hiatus and figured if I only had time to do one or the other, costume should come first.

As of today, I can officially say that it is finished with a week still to go before ConnectiCon.  Woohoo!

It's definitely a great feeling to have seen this process the whole way through.  Now, time to start sharing the rest of the process with you! 
Some of the posts were drafted back in January/February and simply never published until now, like this next part about the sleeves...


Sleeves are starting to take form!  At this point there are only a few finishing touches left to make, but I can't help give a sneak preview.  Again, this took me far longer than expected...I was hoping to spend perhaps 3 to 4 weeks tops to completely finish this piece.  In reality, it has taken me almost 6 weeks.  It's hard to stay motivated when ConnectiCon seems so far away.

Rydia cosplay FF4 sleeve and arm sock by Elathera

Here are a few handy tips for how to get yourself back on track and to stay motivated:

1. Plan ahead how much time you will need to complete your project.  If you set milestones along the way, you'll gravitate toward trying to meet your self-imposed deadlines.
2. If there is a craftsman competition, register!  It will put the pressure on you to fully commit to your project.  (Be sure to register way in advance, as spots fill up quickly!)


Rydia sleeve opening gold trim

It was not easy to sew the yellow boarder around the sleeve opening.  First, I sewed the outer edge the length of the green fabric to eliminate raw edges.  Then, I carefully pinned the yellow strip to the midpoint of the sleeve (with raw edges ironed and pressed underneath).  The hardest part was ensuring the strip length was even on both the exterior and interior of the sleeve.  I used a shorter stitch length when putting it all together.

The next step was to put a yellow/gold trim around the edge.  I traced a pattern in paper and transferred it into the cloth using pastel pencil, and then carefully hand painted the design.  The pastel transfer pre-painting is just visible below.  I was not very impressed with the quality of the paint job, but it looks ok from a distance.

Rydia sleeve opening before painted design

Rydia Sleeves, Part I

I first began my journey on what looks to be the easiest part of Rydia's outfit: her long, flowing sleeves.  When you boil it down, there really is not much to them, yet somehow they still manage to take an inordinate amount of time.

 Rydia FF4 sleeve

Part of the snag I ran into was how to get the yellow border around the opening while still effectively hiding the inner seams.  I decided to do a test run with some scrap fabric and hand-sewed it to get a feel...

Sleeve trial run Rydia

Practice attempt did not go as well as planned.  Originally, I was going to give French seams a shot --- this would hide the seams on both the outside and inside edges.  However, my mind simply cannot wrap itself around how to do that when working with one continuous piece of cloth.

I took custom measurements based on my 5' 6" height to develop a pattern for the sleeves.  It looks like the point on each sleeve hangs just below Rydia's knee when her arm is out straight, and falls below her knee when her arm is folded.  I used tissue paper to make the pattern (for best results, iron or flatten prior to making a pattern).  Here you can see the work in progress with the yellow trim around the sleeve opening:

Rydia cosplay FF4 sleeve opening by Elathera

It's a slippery material.  This is good because it will help the sleeves to "flow" nicely.  But, it makes it darn tricky to sew.  I've tried working with slippery fabrics before with lots of frustration and mixed results.  This time I am [hopefully] coming at this more prepared.  I found a helpful video that provides some tips on working with slippery fabric.  It was incredibly helpful!  I never eealized before that all those different dials on the sewing machine had a real purpose.


Lesson learned: for sewing slippery fabrics, use a lower tension setting, smaller needle, and shorter stitch length.

Sunday, January 13, 2013

Step 0: A Forced Introduction

So I got a scathing call from the Chief Editor saying I had to do an introductory post or else my funding would be cut.  I hope you're all happy now...

I've decided to make my very first totally homemade cosplay!  This summer, Rydia will be making a grand appearance at Connecticon 2013.  There have been a few incarnations of her art and appearance; I am using this one:


Rydia FF4 official art

Who: Rydia from Final Fantasy IV
What: Connecticon 2013
Where: Connecticut Convention Center in Hartford, CT
When: July 12-14, 2013 
How: Absolutely no idea! I will be figuring things out as I go along, and will share my successes and miserable failures along the way.  Sewing is not my strong point, nor have I dabbled in working with resin or beads before.  Thank god for smart people that post video tutorials...
Why: I love to make things and try new mediums.  Arts, crafts, and writing are all passions of mine.  Sadly, it has been a long time since my last serious creative effort.  I see this ambitious goal as a way to revitalize my creative side.  What better way to tap into all of these things than to write about my endeavor as it unfolds?

On a separate note, Rydia is one skinny girl.  This undertaking is not only a chance to flex some creative muscle, but also a fabulous excuse to stick with that pesky New Year's resolution.  My modest goal is to build muscle tone and lose a couple pounds over the next six months.